
| 일 | 월 | 화 | 수 | 목 | 금 | 토 |
|---|---|---|---|---|---|---|
| 1 | ||||||
| 2 | 3 | 4 | 5 | 6 | 7 | 8 |
| 9 | 10 | 11 | 12 | 13 | 14 | 15 |
| 16 | 17 | 18 | 19 | 20 | 21 | 22 |
| 23 | 24 | 25 | 26 | 27 | 28 | 29 |
| 30 |
- 인덱스된 데이터베이스
- 자바스크립트
- React.js
- HTTP
- deploy
- 리액트배포
- 웹사이트
- javascript
- IndexedDB
- github
- 렌더링
- 웹스토리지
- Github Pages
- banner
- react
- 배너 슬라이더
- dnd-kit
- 배열
- slide
- array
- vite
- 웹
- 배너
- 비동기 함수
- js
- 슬라이드
- 슬라이더
- 리액트
- 자바스크립트 배열
- 배포
- Today
- Total
Somedding
nodejs와 react 연동 본문
프로젝트를 생성할 폴더를 만든 후, 리액트 앱을 설치한다.
npx create-react-app
(npm으로 create-react-app을 설치하고 따로 실행해도 상관없음)
그러고 나서 express 모듈을 설치해 줄 것이다.
npm install express
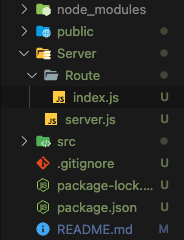
express 모듈이 설치되면 서버를 구동할 server 폴더를 만들고, 서버를 열 server.js을 만들고 라우팅을 담당할 Route 폴더와 Route 폴더에 index.js를 만들어준다.
폴더와 파일들은 다 만들었으면
server.js 파일에 다음과 같이 작성한다.
const express = require("express");
const app = express();
const index = require("./Route/index");
const bodyParser = require('body-parser')
const port = process.env.PORT || 3001;
const cors = require('cors');

app.use(cors());
app.use(bodyParser.json())
app.use(bodyParser.urlencoded({ extended: true }))

app.use("/", index);

app.listen(port, () => {
  console.log(`express is running on ${port}`);
});
여기서 중요한 것은 리액트에서 3000번 포트로 접속을 하기 때문에 3000번 포트와 다른 포트를 주어야 한다.
(지금은 3001번 포트)
(추가)
cors란, 도메인 및 포트가 다른 서버로 클라이언트가 요청했을 때 브라우저가 보안상의 이유로 API를 차단하는 문제를 허용해 준다. 그래서 우리는 npm을 통해 cors 모듈을 다운로드하여 이용하려고 한다.
https://ko.wikipedia.org/wiki/교차_출처_리소스_공유
npm install cors
명령어를 통해 설치하면 된다.
그리고 Route 폴더 안에 있는 index.js 파일에는 다음과 같이 작성한다.
const express = require("express");
const router = express.Router();

router.get("/", (req, res) => {
  res.send("Hello World");
});

module.exports = router;
이제 서버를 실행시키면 된다.
실행할 때는 node ./Server/server.js 명령어로 실행하면 된다.
제대로 동작한다면 웹에 localhost:3001로 접속했을 때, hello world가 뜨는 것을 볼 수 있다.
이제 클라이언트와 서버 연동을 위해 프록시 설정을 해줄 것이다.
그러기 위해서 먼저 porxy를 담당할 모듈을 설치해 준다.
npm install http-proxy-middleware
src 폴더에 setupProxy 파일을 만들고 다음과 같이 작성한다.
const proxy = require("http-proxy-middleware");

module.exports = (app) => {
  app.use(proxy("/", { target: "http://localhost:3001/" }));
};
우선 이렇게 하면 연동할 준비가 끝이 났다.
조금 더 편한 코딩을 위해 nodemon과 concurrently를 설치하겠다.
nodemon은 변동 사항이 있으면 바로 반영을 시켜주는 것이고, concurrently는 서버와 클라이언트를 동시에 사용할 수 있게 해 준다.
npm install nodemon
npm install concurrently
설치 후, package.json 파일에 들어가서 script부분에
"scripts": {
    // 추가하기
    "server": "nodemon ./Server/server.js",
    "client": "npm run start",

    "start": "react-scripts start",

    // 추가하기
    "dev": "concurrently --kill-others-on-fail \"npm run server\" \"npm run client\"",

    "build": "react-scripts build",
    "test": "react-scripts test",
    "eject": "react-scripts eject"
  },
server, client, dev를 추가시켜 주면 된다.
server에 적힌 명령어는 nodemon으로 서버를 구동시키겠다는 의미이고,
client에 적힌 명령어는 리액트 앱을 실행할 의미이다.
dev는 두 명령어를 순차적으로 한 번에 실행시키겠다는 의미이다.
이후
npm run dev
명령어를 입력하고, localhost:3001 과 localhost:3000 이 잘 실행되는지 확인하면 된다.
이제 axios를 이용해서 통신을 하려고 한다.
npm install axios
명령어를 통해 axios를 설치하고, App.js를 다음과 같이 작성한다.
import axios from "axios";
import {useEffect} from "react";

function App() {
  const sendReq = async() => {
    const res = await axios.get('http://localhost:3001');
    console.log(res.data);
  };

  useEffect(()=>{
    sendReq();
  });

  return (
    <div className="App">
    </div>
  );
}

export default App;
이후에 npm run dev로 실행을 하면 포트가 3000번인 페이지에 Hello World가 콘솔에 떠있는 것을 볼 수 있다.
글 내용 중, 잘못됐거나 더 알아야 하는 지식이 있다면 댓글로 남겨주시면 감사하겠습니다!
모두 좋은 하루 보내세요:)
'React' 카테고리의 다른 글
| React의 훅(useEffect) (0) | 2023.06.26 |
|---|---|
| React의 훅(useState) (0) | 2023.05.31 |
| JSX란? (0) | 2023.03.10 |
| React.js 실행하기 (0) | 2023.02.27 |
| React.js 설치하기 (0) | 2023.02.23 |