[Toy Projects] 'Color, me' project (3)
구현 동작 5번을 진행하기 전에, 4번의 연장선으로 추가한 색 조합들을 정렬, 또는 무작위로 배치를 하면 더 좋은 색 조합을 저장할 수 있지 않을까 라는 생각을 하게 됐다.
색을 밝기 순으로 정렬하게 되면 더 자연스럽게 인지할 수 있고, 무작위로 배치를 하면 다양한 상황(ex. 인테리어)에 대입할 수 있을 것이라는 생각이 들었다.
그러기 위해서는 색상들의 밝기 정보를 알아야 한다. (현재 색상 정보는 hex 정보로 #000000으로 표시된다.)
밝기 정보로 색상을 표시하는 기법 중 하나인 HSL로 변환하면 색상들을 밝기 순으로 정렬할 수 있다고 생각했다.
// 추가한 색상들을 저장하는 배열
let colorArr = [];
// colorArr에 저장된 색상들을 H, S, L로 변환하여 담을 배열
let hsl = [];
우선 추가한 색상들을 쉽게 관리하기 위해 전역으로 배열을 생성해 주었다.
그로 인해, 색상을 리스트에 추가하고 삭제할 때에도 colorArr를 사용할 수 있게 되었다.
// HEX에서 RGB로 변환
function HEXtoRGB(str) {
    // str형식 : #000000
    let hexRed = str.substr(1, 2);
    let hexGreen = str.substr(3, 2);
    let hexBlue = str.substr(5, 2);

    let rgbRed = parseInt(hexRed, 16);
    let rgbGreen = parseInt(hexGreen, 16);
    let rgbBlue = parseInt(hexBlue, 16);

    return [rgbRed, rgbGreen, rgbBlue];
}

// RGB에서 HSL로 변환
function RGBtoHSL(rgbArr) {
    let r = rgbArr[0];
    let g = rgbArr[1];
    let b = rgbArr[2];

    r /= 255;
    g /= 255;
    b /= 255;

    let max = Math.max(r, g, b),
        min = Math.min(r, g, b);
    let h,
        s,
        l = (max + min) / 2;

    if (max == min) {
        h = s = 0;
    } else {
        var d = max - min;
        s = l > 0.5 ? d / (2 - max - min) : d / (max + min);

        switch (max) {
            case r:
                h = (g - b) / d + (g < b ? 6 : 0);
                break;
            case g:
                h = (b - r) / d + 2;
                break;
            case b:
                h = (r - g) / d + 4;
                break;
        }

        h /= 6;
    }
    return [h, s, l];
}
이렇게 HEX에서 RGB로의 변환을 한 후, RGB에서 HSL로의 변환을 거치면 색상들의 밝기 정보를 알 수 있다.
// plusColor()에 삽입된 코드
hsl = RGBtoHSL(HEXtoRGB(color_value));
colorArr.push({
    hex: color_value,
    h: hsl[0],
    s: hsl[1],
    l: hsl[2],
});
colorArr배열 상태
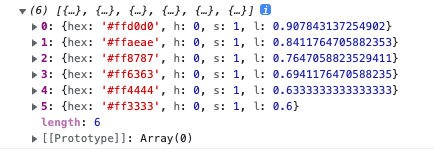
HEX와 HSL이 잘 정리된 모습이다!
(실제로 색상 변환기에 적용했을 때의 값과 동일)
이를 통해 colorArr의 HEX 값을 이용하여 기존의 추가, 삭제, 변경을 고쳐주었다.
// 변경된 추가 관련 함수
function plusColor(color_value, count) {
    hsl = RGBtoHSL(HEXtoRGB(color_value));
    colorArr.push({
        hex: color_value,
        h: hsl[0],
        s: hsl[1],
        l: hsl[2],
    });

    printColor(count);

    if (count === 1) { // 첫번째 리스트가 추가됐을 경우
        let color_input = document.getElementById("color-input");
        let span = document.createElement("span");
        span.textContent = "|";
        color_input.appendChild(span);
        let save_btn = document.createElement("button");
        save_btn.setAttribute("onclick", "saveColor()");
        save_btn.classList.add("btn");
        save_btn.textContent = "저장";
        color_input.appendChild(save_btn);
    }
}

// 색상이 추가되면 리스트에 추가
function printColor(count) {
    // 리스트를 만들어서 추가
    let color_name = document.getElementById("color-name");
    let color_row = document.createElement("li");
    color_row.classList.add("color-row");
    color_row.setAttribute("onmouseenter", "mouseenter(" + count + ")");
    color_row.setAttribute("onmouseleave", "mouseleave(" + count + ")");
    color_row.textContent = colorArr[count - 1].hex;
    color_name.appendChild(color_row);

    // 팔레트에 해당 색상을 배경색으로 갖는 div 추가
    let color_palette = document.getElementById("color-palette");
    let color_div = document.createElement("div");
    color_div.classList.add("color");
    color_div.style.backgroundColor = colorArr[count - 1].hex;
    color_palette.appendChild(color_div);
}
// 변경된 삭제 관련 함수
function removeColor(count) {
let color_name = document.getElementById("color-name");
let color_row = document.getElementsByClassName("color-row")[count - 1];
let color_palette = document.getElementById("color-palette");
let color_div = document.getElementsByClassName("color")[count - 1];
color_name.removeChild(color_row);
color_palette.removeChild(color_div);
colorArr.splice(count - 1, 1);
// 저장 버튼과 그 앞의 | 삭제
if (colorArr.length === 0) {
let color_input = document.getElementById("color-input");
color_input.removeChild(color_input.childNodes[6]);
color_input.removeChild(color_input.childNodes[5]);
}
onoffMouse(0);
}// 변경된 수정 관련 함수
function updateColor(count) {
mouseleave(count);
let _color = colorArr[count - 1].hex;
document.getElementById("color-value").value = _color;
document.getElementsByClassName("clr-field")[0].style.color = _color;
AddtoUpdate(count);
onoffMouse(1);
}
function update(count) {
let color_value = document.getElementById("color-value").value;
let color_row = document.getElementsByClassName("color-row")[count - 1];
color_row.textContent = color_value;
hsl = RGBtoHSL(HEXtoRGB(color_value));
colorArr[count - 1] = {
hex: color_value,
h: hsl[0],
s: hsl[1],
l: hsl[2],
};
let color_div = document.getElementsByClassName("color")[count - 1];
color_div.style.backgroundColor = color_value;
UpdatetoAdd();
onoffMouse(0);
}
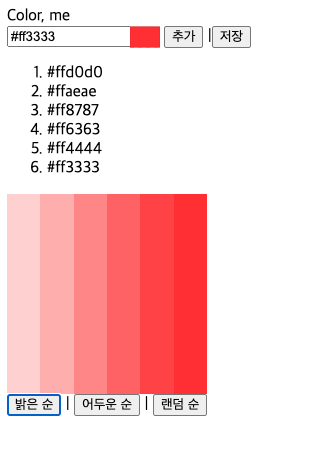
이제 해야 할 것은 정렬이다.
밝은 순, 어두운 순, 랜덤 순 → 총 3개의 정렬을 사용할 것이다.
html에 간단한 코드를 추가하고 정렬 코드를 짰다.
<div id="contents">
    <div id="contents-top">
        <div id="contents-left">
            <div id="color-input">
                <input type="text" value="#000000" id="color-value" data-coloris>
                <button class="btn" onclick="okay();">추가</button>
            </div>
            <ol id="color-name">

            </ol>
        </div>
        <div id="contents-right">
            <div id="color-palette">

            </div>
        </div>
    </div>
    <div id="contents-bottom">
        <button onclick="lightSort(1);">밝은 순</button>
        <span>|</span>
        <button onclick="lightSort(-1);">어두운 순</button>
        <span>|</span>
        <button onclick="randomSort();">랜덤 순</button>
    </div>
</div>
// 밝기순으로 정렬
function lightSort(type) {
// type이 1일 때 밝기순
// type이 -1일 때 밝기역순
colorArr.sort(function (a, b) {
// l값으로 비교(l값에 대해 내림차순)
if (a.l != b.l) return type * (b.l - a.l);
else {
// l값이 같으면 s값으로 비교(s값에 대해 내림차순)
if (a.s != b.s) return type * (b.s - a.s);
else {
// s값도 같으면 h값으로 비교(h값에 대해 오름차순)
if (a.h != b.h) return type * (a.h - b.h);
else return 0;
}
}
});
document.getElementById("color-name").innerHTML = null;
document.getElementById("color-palette").innerHTML = null;
for (let i = 1; i <= colorArr.length; i++) {
printColor(i);
}
}
// 랜덤으로 정렬
function randomSort() {
colorArr.sort(function () {
return Math.random() - 0.5;
});
document.getElementById("color-name").innerHTML = null;
document.getElementById("color-palette").innerHTML = null;
for (let i = 1; i <= colorArr.length; i++) {
printColor(i);
}
}
여기서 밝은 순, 어두운 순은 서로 역순이기 때문에 인자로 1 또는 -1을 전달하여 sort() 내의 리턴값이 반대가 되도록 했다.
(추가)
밝기가 서로 같으면 채도가 높으면 더 밝다고 판단했고, 밝기와 채도가 같으면 색조가 낮으면 더 밝다고 판단했다.
밝기 순 정렬 결과

랜덤 정렬 결과

이렇게 구현 동작 4번이 완전히 끝났다.
다음 글에서 구현 동작 5번을 다루도록 하겠다.
글 내용 중, 잘못됐거나 더 알아야 하는 지식이 있다면 댓글로 남겨주시면 감사하겠습니다!
모두 좋은 하루 보내세요:)